


In this blog post, I will explain basic concepts of React.js, and I will also clarify some of the most asked questions about them:
What is React?
Why we use react?
Who uses React?
React Vs Angular Vs Vue
What is a state?
What is props?
How to handle HTML?
More ….
We will also learn about these topics
· Create a New React App
· Extension for making our code more easer to build React App
· Application structure
· Components
· Virtual DOM
· What is JSX?
· Exploring our first React component — <App/>
· Export statements
· React State
· How to install bootstrap
· Styling
· Rendering Classes Dynamically
· Reading List
· Conditional Rendering
· Handling Events In React
· Updating the state
· what happens when the state changes.
· React Hooks
· Props
· What are props in React?
· Props vs state more …
What is React?
React is a JavaScript library for building fast and interactive use interfaces. It was developed at Facebook in 2011 and currently, it’s the most popular JS library for building user interfaces.
Why we use React?
Here is a comparison of the top 3 libraries/frameworks for building user interfaces: React, Angular and Vue.
React Vs Angular Vs Vue
As you can see, it is dominating the space, so if you want to expand your job opportunities as a front-end developer, you should have it on your resume. All of them are used for User-Interface
Being a front-end developer is incredible right now. We can pick between lots of awesome JS frameworks.
I like to use React because Facebook’s React has changed the way we think about web applications and user interface development.
Why we use react? therefor
There are many big reasons why React has become so popular. But the main ones are:
Clean programming — by creating your views with React, you get easy-to-read and easy-to-reuse code.
Fast performance — React for small and large projects work very quickly thanks to the Virtual DOM it uses.
Still using JavaScript — we still using JavaScript, so it’s not like learning something that can be applied to another framework in the feature.
Who uses React?
Many large-scale companies are using React in production. This is very encouraging when deciding to use React for your own projects, big and small,
Here are some of the biggest sites built with React.
Netflix
Facebook
Instagram
Airbnb
Cloudflare
Dropbox
BBC
Postmates
Reddit
And the list goes on !!!.
Another cool thing about learning React is that we can use that knowledge to build Mobile Apps with React Native.
Facebook and Instagram
Walmart
Bloomberg
Tasla
Wix
In 2019, React is one of the popular JavaScript frontend frameworks.
According to stack Overflow’s, the developers that loved it. Also, on GitHub stars.
Create a New React App
To install react we will need to make sure that our development environment is ready for us to start using Create React App.
1- Install Node.js and NPM
2- Code editor
Both are used to manage libraries (node packages) you will need along the way. These node packages can be libraries or whole frameworks. We’ll install external node packages via npm (node package manager).
You can verify node and npm versions in the command line using the **node — version** command.
Command-line
npm –v 6.14.8 node –v
v14.15.0
Now to install react on your machine see documentation of React.js https://reactjs.org/docs/create-a-new-react-app.html
Extension for making our code more easer to build React App.
1. Aye
A simple theme with bright colors and comes in three versions — dark, light, and mirage for all-day-long comfortable work. My favorite themes.
2. Simple React snippets
Is used for the essential collection of React snippets and commands
Snippets shorts
1. Im Import React
- Imrc import React / component
3. Impt import Prop Types
- Cc class component
3. Prettier — Code Formatter
Vs code package to format your JavaScript / Typescript / CSS using Prettier, My favorite one
4. Material Icon theme
Material design icons for Visual studio code
To install this extension, we use vs code extension button. On the left side of vs code
At the heart of all React application ore components
Component
A component is essentially a piece of the user interface. So, when building applications with React, we build a bunch of independent, reusable components and then compose them to build complex user interfaces.
Components allow us to reuse the same structure, and then we can populate those structures with different sets of data.
The react all applications are components a component is a Piece of the UI.
Every React app has at least one component, which we refer to as the root component. this component represents the entire application and contains other child components. So, every React application is essentially a tree of components.
A real example
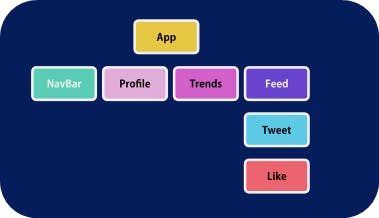
Let’s imagine we want to build an application like Twitter. We can split this page into components like NavBar, Profile, Trends, and Feed.
 components
So, on the top, we have App, this component has 4 children: NavBar, Profile, Trends, and Feed, which includes several Tweet components. Each Tweet component can include a Like component, which we can re-use on the pages or even in different applications.
Example. Code looks like this
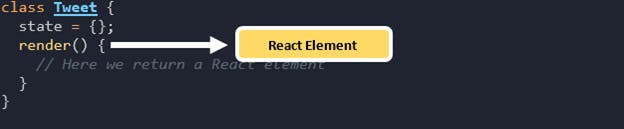
A component is typically implemented as a JavaScript class. That has some state and a render method.
 render method
1- The state here is the data that we want to display when that component is rendered.
2- And the render method, as you can tell, is responsible for describing what the UI should look like.
If a component doesn’t have a state, we can implement it using a pure function instead of a class.
Virtual DOM
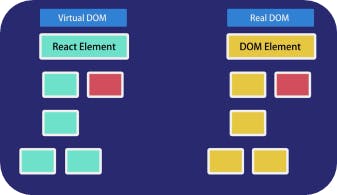
The output of this render method is a React element which is a simple, plain JavaScript object that maps to a DOM element. It’s not a real DOM element, it’s just a plain JS object that represents that DOM element in memory.
So. React keeps a lightweight representation of the DOM in memory. We refer to this as the virtual DOM. Unlike the browser or the real DOM, this virtual DOM is cheap to create. When we change the state of a component, we get a new React element. React will then compare this element and its children with the previous one, it figures out what is changed, and then it’ll update a part of the real DOM to keep it in sync with the virtual DOM.
 virtual DOM
We simply change the state of our components, and React will automatically update the DOM to match that state.
React vs Angular 2+
React and Angular are similar in terms of their component-based architecture. But Angular is a framework or a complete solution, while React is a library. It only takes care of rendering the view and making sure that the view is in sync with the state. That’s all React does, nothing less, nothing more! For this very reason, it has a small API to learn.
So, when building applications with React, we need to use other libraries for things like routing or calling HTTP services, and so on. But this is not necessarily a bad thing, because you get to choose the libraries that you prefer as opposed to being fixed with what Angular gives you, which often breaks from one version to another!
Application structure
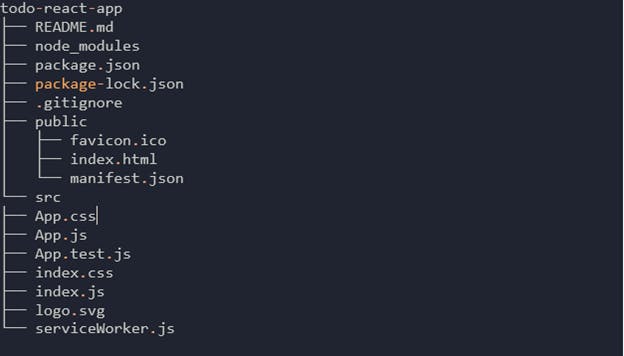
Create-react-app gives us everything we need to develop a React application.
 Application structure
Meet the React Component
Our first React component is in the src/App.js file, which should look similar to the example below.
 App.js component
first, this React component, called the App component, is just a JavaScript function. It’s commonly called function component, see component types later. Sometimes you need a small, lightweight declaration of a component to just display something simply and easily where you are not worried about interaction. The easiest way to declare a component in React is with functional syntax.
The app component returns code that resembles HTML which is called JSX.
 JSX
JSX
Introduction to JSX (JavaScript XML).
Recall that I mentioned the returned output of the App component resembles HTML. This output is called JSX. Which mixes HTML and JavaScript. To be able to write components in React, we need to understand the primary templating language that React uses to build a component. JSX.
What is JSX?
JSX is the templating language of React. JSX has the benefit that it is just JavaScript. It comes with the full power of JavaScript.
JSX convert HTML tags into React elements.

Let us demonstrate with two examples, the first use JSX and the second does not:
Example 1.
 JSX
JSX
Example 2.
 Without JSX
As you can see in the first example, using the JSX to descript, what the UI looks like much easier than writing plane react code like this in example 2.
So, in the component we all use JSX, Babel can convert JSX syntax! That browser can understand. Babel is a modern JavaScript compiler
Babel
Since we want to use the latest features of JavaScript along with JSX, we’re going to need a way to convert our fancy source code into something that the browser can interpret. This process is called compiling, and its what Babel is designed to do.
Diving deeper into JSX
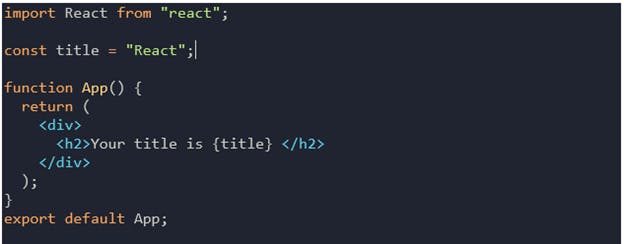
- Expressions in JSX with JSX you can write expressions inside curly braces { }.
the expression can be a React variable, or property, or any other valid JavaScript expression. JSX will execute the expression and return the result.
 curly braces { }
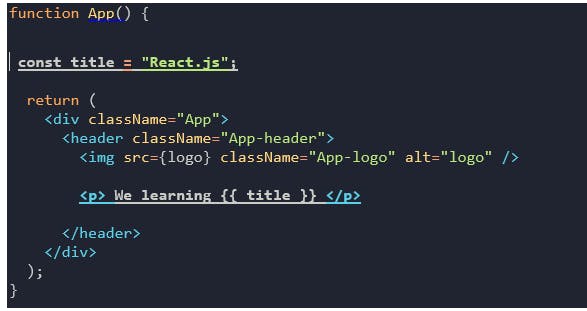
- Variables in JSX
We’ll talk about how variables are used inside JSX. let’s try making a variable of our own. Before the return statement of an app and const title = ‘React.js’;
 Variables in JSX
- Specifying Attributes with JSX
Does the same thing in React and HTML. as mentioned before, things get trickier with the class attribute in THML. Since the class is a reserved word in JavaScript, we instead have to use className as a substitute.
 Attributes
- Styling HTML elements
What if we want to declare styles on a particular HTML element ? this gets a little trickier, since it requires you to write a little bit of JavaScript inside of your element. You will need to embed a JavaScript object inside the style attribute that return whatever CSS properties you need to include, as in the following.
 styling THML Element
Exploring our first React component — <App/>
In React a component is a reusable module that renders a part of our app. These parts can be big or small, but they are usually clearly defined.
Let’s open src/App.js , since our browser is prompting us to end it. this file contains s our first component, App, and a few other lines of code
 src/App.js
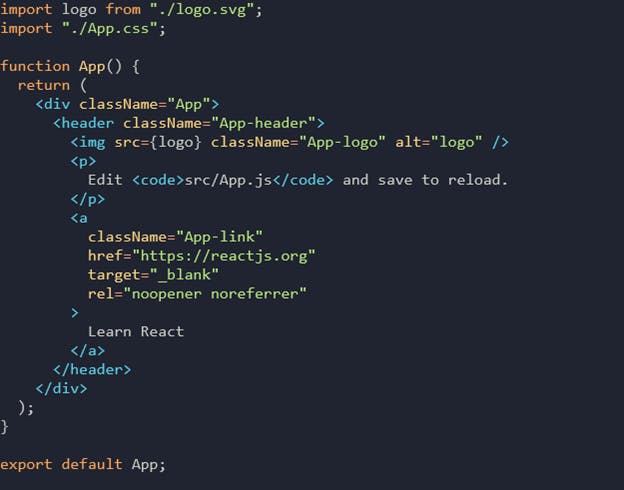
the App.js file consists of three main parts:
Import statements at the top
The app component in the middle
And an export statement at bottom
The import statement at top of the file allow App.js to use code that has been defined elsewhere. These are the modules that are imported
 App.js File
- the first statement imports the React library itself. Because React turns the JSX we write into React.createElement(), *all React components must import the React module. If you skip this step, your application will produce an error. And it is listed as a dependency in our *package.json file.
- The second statement imports a log form ‘./logo.svg’.
- The third statement imports the CSS related to our App component. Note that there is no variable name no from directive. And — it comes from Webpack, the tool create-react-app uses to bundle all our JavaScript files together and serve them to the browser.
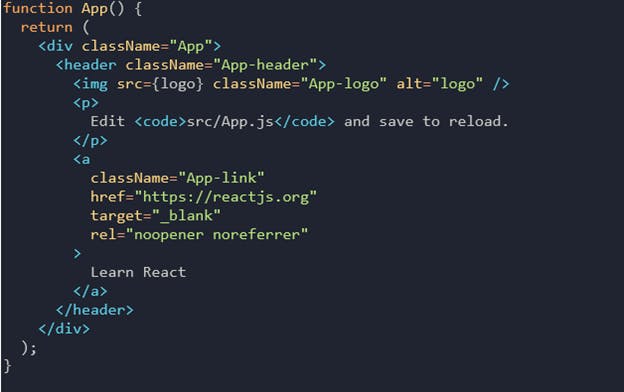
The App component
After the imports, we have a function named App. Most of the JavaScript community prefers camel-case names like helloWord.
React components use pascal-case variable names, like HelloWord, to make it clear that a given JSX element is a React component. Not a regular HTML tag.
If we were to rename the App function to app, the browser would show you an error
 App component
The App function returns, a JSX expression, this expression defines what your browser ultimately renders to the DOM.
Some elements in the expression have attributes, which are written just like in HTML, the <div> tag has a className attribute this is the same as the class attribute in HTML, but because JSX is JavaScript, we can’t use the word class
Export statements
At the very bottom of the app.js file, the statement export default App makes our App component available to other modules.

interrogating the index.js
let’s open src/index.js, because that’s where the App component is being used. This file is the entry point for our app
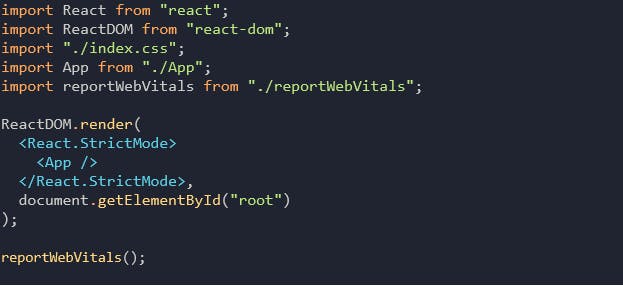 src/index.js
As with App.js, the file starts by importing all the JS modules and other assets it needs to run.
Src/index.css holds global styles that are applied to our whole app. We can also see our App component imported here.
It is made available for import thanks to the export statement at the bottom of App.js
Calls React’s ReactDOM.render() function with two arguments
.The component we want to render, <App /> in this case
.The DOM element inside which we want the component to be rendered, in this case the element with and ID of root. If you look inside public/index.html, you’ll see that this is a <div> element just inside the <body>
All of this tells React that we want to render our React application with App component as the root, or first component.
Some Questions in my Mind.
1- How to render HMTL?
Answer- to render HMTL we use ReactDOM.render(), React renders HTML to the web page by using a function called. ReactDOM.render().
The ReactDOM.render() function takes two arguments, HTML code and an HTML element.
The purpose of the function is to display the specified HTML code inside the specified HTML element.

2- what is render method?
Answer- to create class component we should use render method. The component also requires a render() method, this method returns HTML.
3-what is state?
In React, component properties should be kept in an object called state.
React State
React component has a built in state object. The state object is used to store data and property value that belongs to the component.
When the state object changes the component re-renders.
State is special property in React component and basically it an object that include any data that this component need.
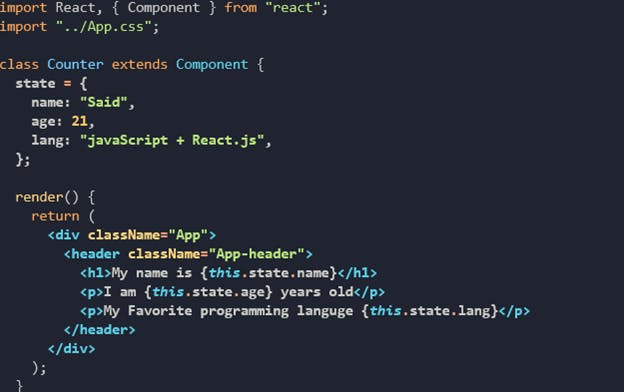 Example: Creating the state Object
we can also use constructor function
The state object is initialized in the constructor:
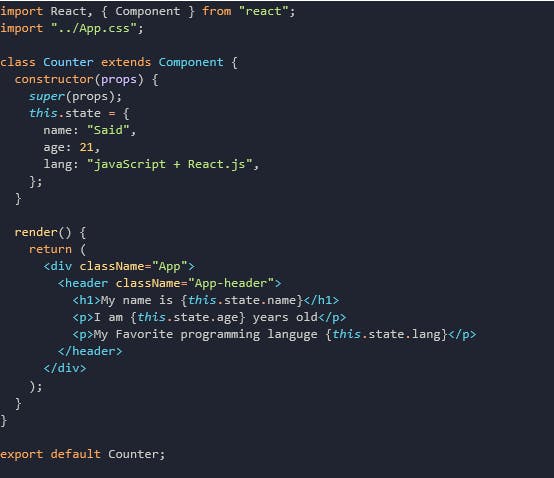 state in constructor
Refer to the state object anywhere in the component by using the this.state.propertyname syntax:

Example 2.
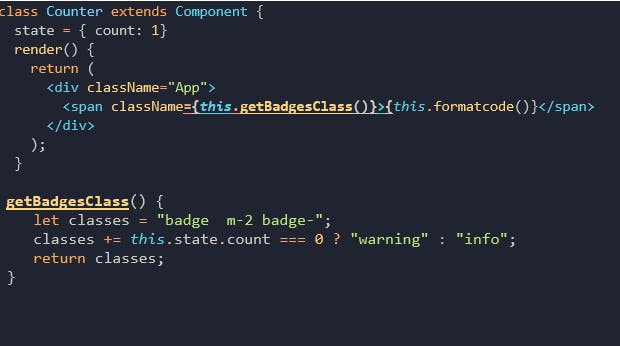
In this method we want to check the value of the count property. If the value of count property = 0, count: 0, we return “Zero” as string. Then it will return the value of count itself.
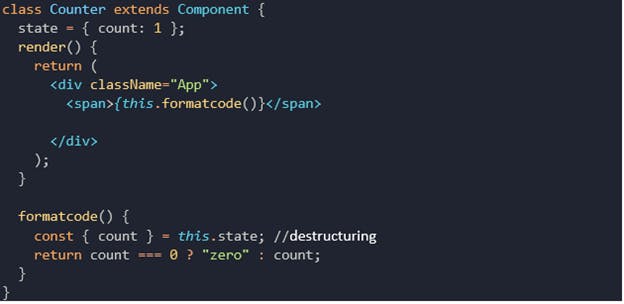 state
state
if the count value change to 0 it Zero as label, or if we change the count value to 1,2, 3 … it will show itself value.
Styling
there are two primary ways to style react components
Inline styles with the style prop
Regular CSS with the className prop
About the style prop:
- In HTML you’d pass a string of CSS
 html css
- In React you’ll pass an object of CSS:
 React CSS
Note also that the property names are camelCased rather than kebab-cased. The matches the style property of DOM nodes (which is a CSSStyleDeclaration object ).
About the className prop:
As we discussed earlier , in HTML, you apply a class name to an element with class attribute. In JSX, you use the className prop
How to install bootstrap
Install the bootstrap using this command. npm i bootstrap@4.1.1
Import your bootstrap files to index.js
 import bootstrap
now we can use bootstrap
 useing bootstrap
Rendering Classes Dynamically
Now our badge currently is blue looking the above example, if the value of count property is 0 zero, we want to rendering it as yellow color, we want to show warning color otherwise blue.
 Rendering Classes Dynamically
Reading List
We can use map() function to render list of an array with this e can render list of items. We loop through the list array using the JavaScript map() function . we return a <li> element for each item.
 Array
Array
 map function:
Note: But when you run this code, you will notice that React also throws a warning. Open your console see, this error.
Warning: Each child in a list should have a unique “key” prop. Check the render method of
Counter. See https://reactjs.org/link/warning-keys for more information
The reason React is because its need to uniquely identify each item in this list, because if the state of this React element in the virtual DOM changes React quickly figure out, what element change and where the in DOM it should make changes to keep the DOM, with virtual DOM.
Because, a “Key” is a special string attribute you need to include when creating list of elements.
How do you use Keys in Lists?
Keys help React identify which items have changed (added/removed/re-ordered). To give a unique identity to every element inside the array, a key is required.
To better understand this, let’s refactor the code snippet we saw earlier, to now include keys.
 key in list
But in real Application your key={list} maybe object, they could have id property.
 key list by id
Conditional Rendering
Conditional rendering is rendering elements that may or may not be displayed on a web page depending on certain conditions or events. These conditionals are decision paths in your code statement. conditional rendering in React works the same way conditions work in JavaScript. We use If operator or the conditional operator to create elements representing the current state, and let React update the UI to match them.
Example:-
If our array is empty, our array should have at least one element. Otherwise we want to display a message, there is no data in list,
 Conditional Rendering
now our state list is empty it will run the conditions, otherwise it will show our list data.
There is also another way to conditioning rendering content. using the && operator.
 conditional by && operator
Handling Events In React
Handling events with React elements is very similar to handling events on DOM elements. Just like HTML React can perform actions based on user events.
React has the some events as HTML: click , change, mouseover etc .
Remember Points
React events are named using camelCase, rather than lowercase onClick instead of onclick
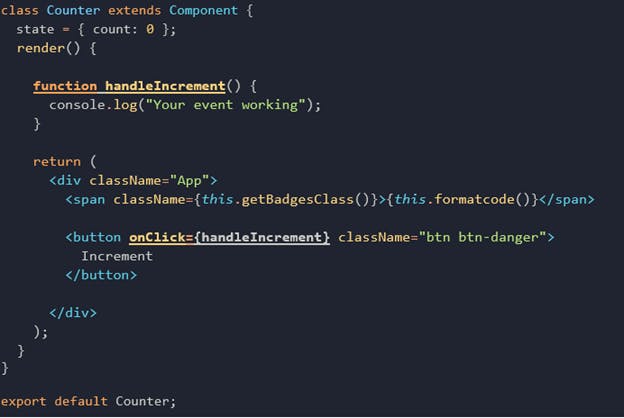
With JSX you pass a function as the event handler, rather than a string. React event handlers are written inside curly braces onClick={ handleIncrement() } instead of onClick=” handleIncrement”
A good practice is put the event handler as a method in the component class.
 event handler
When we click on the button the function will be run in console.
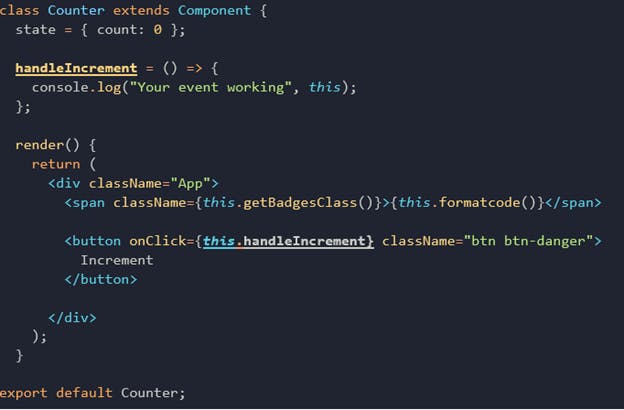
Binding Event handler this keyword
For methods in React, this keyword should represent the component that owns the method. If we use this keyword in handleIncrement() function it won’t working. because this keyword in JavaScript behaves differently from other languages
What is the problem solution?
There is two ways.
We use the bind() method to solve this problem
We use the arrow function to solve this problem
Both of them are good but good practice is to use the arrow function.
That is why you should use arrow functions, with arrow functions, this keyword will always represent the object that defined the arrow function.
Updating the state
To change a value I the state object, use the this.setState() method. React knows the state has changed, and calls the render() method again to learn what should be on the screen.
When a value in the state object changes, the component will re-render, meaning that the output will change according to the new values.
Example:
We add button with an onClick event that will change the value of count property. To click the button it will increment the value.
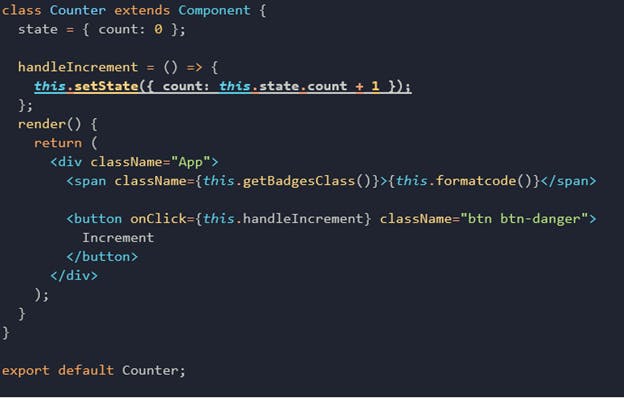 Updating the state
Do not modify state directly
For example, this will not re-render a component

instead, use setState()

what happens when state changes.
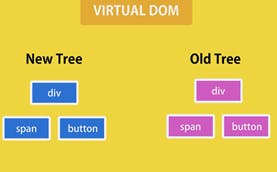
let’s see what exactly happen when we click the Increment button, we are calling this.setState() method, this method telling to React that the state of the component is going to change, React will then schedule a call to the render() method, some time in the future this method is going to be call, we don’t know when. This is a asynchronous call, which mean going to happen in the future, it may happen 5 millisecond later, or 10 millisecond later, we don’t know. So at some point in future the render() method is going to be call.
And this render() method is return new React element, element is this <div> at top this React element has two children a <span> and the <Button> .
So our virtual DOM is tree of three elements the React element on the top that is <div> two children <span> <button>, here we have New Tree Virtual DOM, we also have Old Tree Virtual DOM
React will put these side by side and compare them to figure out, what elements in the virtual DOM are modifying
 virtual DOM
React Hooks
How to use state in React Hooks?
Starting with version 16.8.0, React introduced hooks. And they’ve completely changed the way we write code in React.
Hooks are a new addition in React 16.8. They let you use state and other React features without writing a class.
Using React Hooks we can use state and lifecycle methods inside functional components.
React hooks are functional components with added state and lifecycle methods.
we are going to introduce two of the popularity used React hooks: useState and useEffect . these are widely used and can solve most of our problems.
*Note: there are other types of hooks that come bundled with React library. We can check React website online documentation*
useState Hooks
this is new function useState in the first “Hook” Starting React by learning about the useState hook to manage component state.
However, I have recently discovered that it possible to use a state object instead.
Question!
- What is deference between state and useState?
I am confused, and can’t seem to find many references on the internet to help me understand the difference.
Option 1. State Object
State object In previous we studied state object, you can check it.
 state Object
Option 2. useState hook.
 useState hook
They’re not interchangeable.
1- this.state:
is use for class component.
State object, or this.state was used when React used class
2- useState:
is use for function component.
Before React 16, function could be used as component, but didn’t have state, with Hooks, the functions could have state as well.
It’s means that state are used in class component, and useState are used in function component.
Equivalent class example If you used classes in React Before, this code should look familiar.
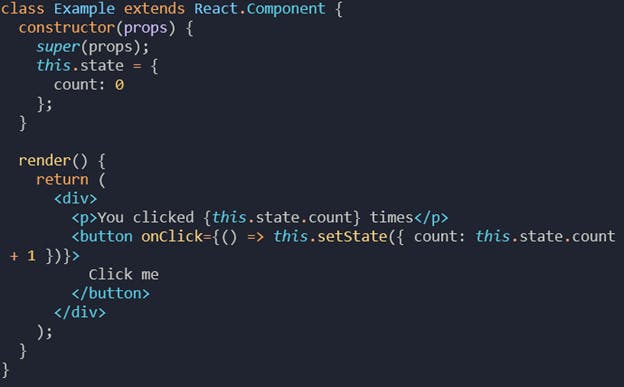 without Hook
We’ll start learning about Hooks by comparing this code to an equivalent class example.
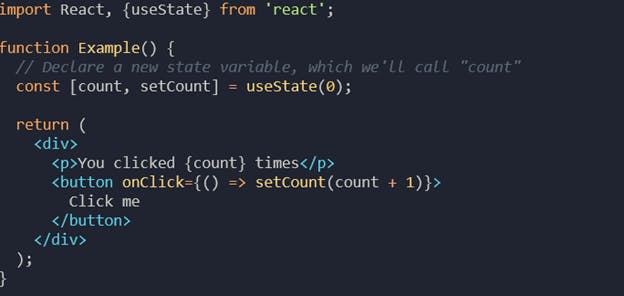 with Hook
When would I use a Hook? If you write a function component and realize you need to add some state to it, previously you had to convert it to a class. Now you can use Hook inside the existing function component.
Declaring a State variables
*We import the `useState` Hook from React. It lets us keep local state in a function component.*
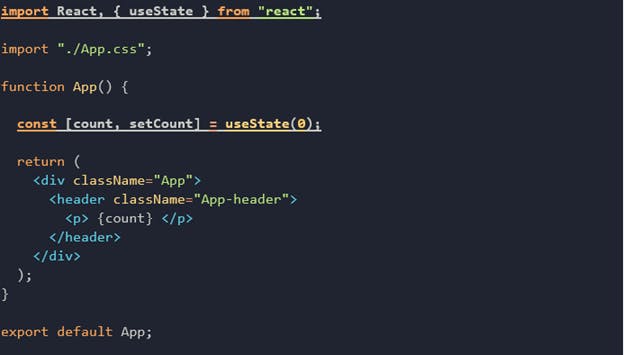 Declaring a State variables
we declare a state variable called count, and set it to 0. React will remember its current value between re-renders, and provide the most recent one to our function.
If we want to update the current count, we can call setCount.
Reading state
When we want to display the current count in a class, we read this.state.count

But in a function, we can use count directly.

Updating State In class, we need to call this.setState() to update the connt state

in a function, we already have setCount and count as variables so we don’t need this

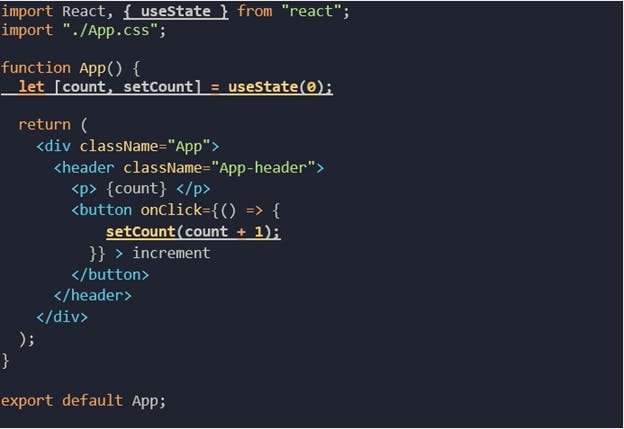 Full Code
Props
What are props in React?
Another important concept of components I show they communicate. React has a special object called a prop (stands for property) which we use transport data from one component to another.
Passing in props allows components to take in information along the way and change how the component is rendered to the end user
But be careful props only transport data in a one-way flow (only from parent to child components) it is no passible with props to pass data form child to parent.
Example: Let’s revisit the ParentComponent.jsx page to see how to pass data with props.
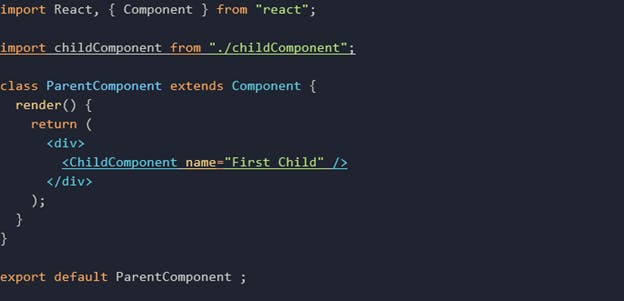 ParentComponet.jsx
- first, we define a prop on the ParentComponent Component and assign a value to it. [ <ChildComponent name=”First Child” /> ]
props are custom values and they also make components more dynamic. Since the (ChildComponent), component is the child here, we need to define props on its parent (ParentComponent ), so we can pass the values and get the result simply by accessing the prop “name”:
 childComponent.jsx
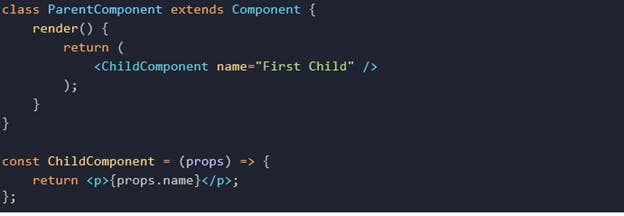 Full Code
Props vs state
What are differences between Props and state
Props include data that we gave to a component,
or state include data that is local or private to that component,
so others component not access that state, it’s completely internal to that component.
Props are used to pass data, whereas state is for managing data
Data from props is read-only, and cannot be modified by a component that is receiving it from outside.
All the attributes that we set these are the props the input to the component

State is not to be confused with props. State is what is managed within the component, whereas props is what get passed to the component.
Example 2: Creating Profile Component as a Class Component
We have 2 files profile.jsx and App.jsx
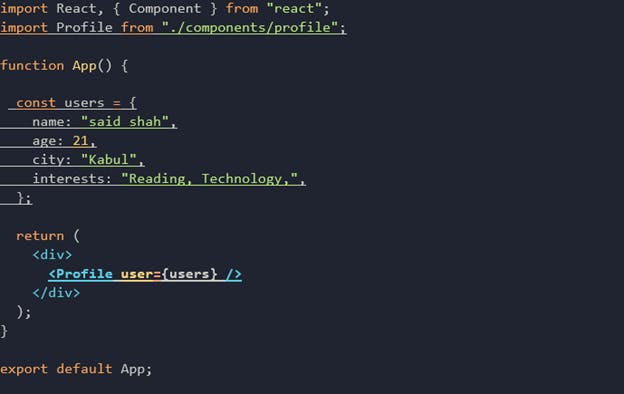 App.jsx
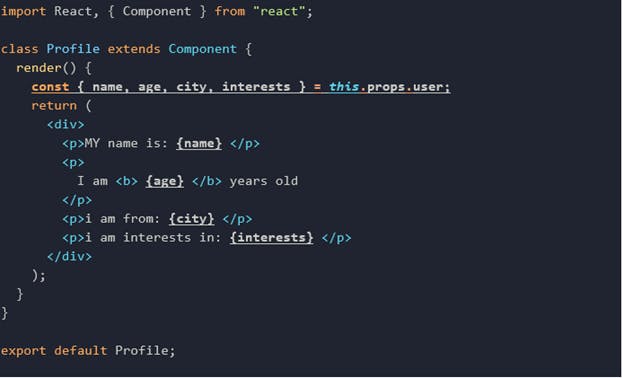 profile.jsx
Example 3: we’ll use React props to pass the array to the List component:
we need 2 files App.jsx and list.jsx
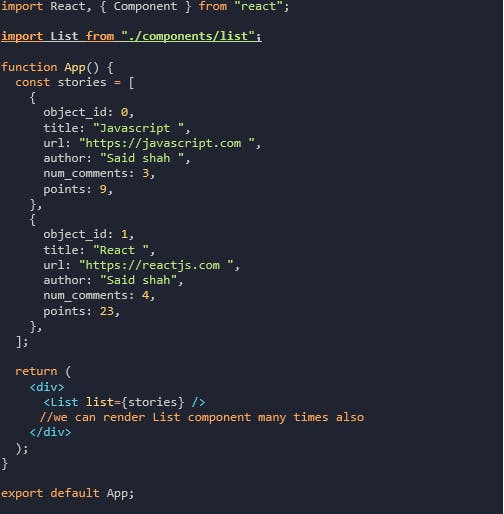 App.jsx
the variable is called stories in the App component, and we pass it under this name to the List component. In the List component’s instantiation, however, it is assigned to the list attribute. We access it as list from the props object in the List component’s function signature.
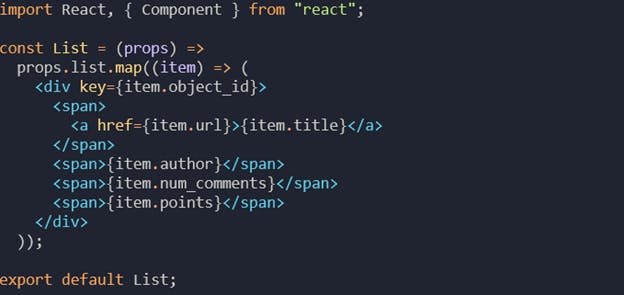 list.jsx
using this operation, we’ve prevented the list/stories variable from polluting the global scope in the App component. Since stories is not used in the App component directly, but in one of its child components, we passed them as props to the List component, there, we can access it through the first function signature’s argument, called props.
Composing components
Components can refer to other components in their output. This lets us use the same component abstraction for any level of detail. A button, a form, a dialog, a screen. In React apps, all those are commonly expressed as components.
Or
So for this application we have work with the single component, the React application is tree of components, so we can compose components together to build complex user interfaces.
For example, we can create an App component that renders Counter many times.

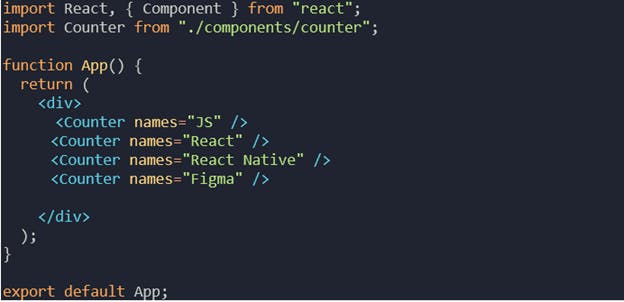 App.jsx
React.js is one today’s of the most widely used JavaScript libraries that every front-end developer should know.
I hope this article helps you understand the basic React, concept, there are also other important things to cover about React, and I will keep writing about them later.
Thank you for reading :)!
Good luck!
Said Shah Ahmadi